|
| EWD Projects :: Oldschool |
|
|
|
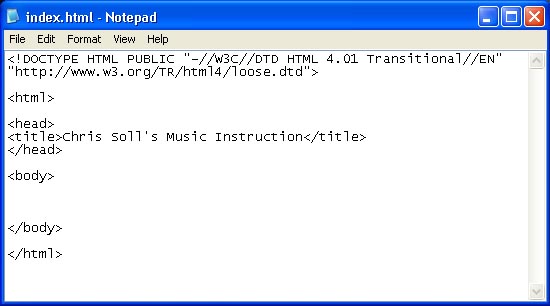
Demystifying Basic HTMLPreparing Your Home Page FilePrint This Procedure ( doc :: pdf ) After you have your folders and graphic files in place, you’re ready to begin creating your site’s home page. To begin the creation process, you need to create an HTML document that contains the standard tags that appear in all HTML documents. The standard tags are: · <!DOCTYPE...> · <html></html> · <head></head> · <title></title> · <body></body> Notice that, with the exception of the <!DOCTYPE...> tag, the standard tags all come in sets. The following figure shows the proper way to nest the standard HTML tag sets in an HTML document and shows how to insert title text. After you type the standard HTML tags in a text document, you need to save the text document as an HTML document, as described in the next procedure.
The standard HTML tags with title text inserted between the <title> tags note Remember that HTML isn’t case-sensitive, so you can type <HTML>, <html>, <HtMl>, or any other combination of capital and lowercase letters and your tag will be fine. In this walkthrough, we use lowercase letters for HTML tags throughout because XHTML, the next incarnation of HTML, requires lowercase tags. Therefore, we're hoping to help you get into the habit of using lowercase tags now. To begin creating the music site’s home page and save it as an HTML file, follow these steps: 4. Open Notepad, WordPad, or TextEdit. We use Notepad throughout this project. 5. Click in a new blank document and type the following document type definition (which indicates that the document uses the HTML 4.01 standard and contains deprecated tags): <!DOCTYPE html PUBLIC "-//W3C//DTD HTML 4.01 Transitional//EN" "http://www.w3.org/TR/html4/loose.dtd">
6. Press Enter twice. 7. Type <html>, and then press Enter twice. 8. Type <head> and press Enter. 9. Type <title>Chris Soll's Music Instruction</title>, and then press Enter. 10. Type </head> and press Enter twice. 11. Type <body>, press Enter a few times (to give you some breathing room when you enter your Web page’s content information), type </body>, and press Enter twice. note Content text text that displays between and outside HTML tags displays in the same case as it is entered in the text document. Thus, if you type chris soll’s instead of Chris Soll’s in step 4, Chris’s name will appear in all lowercase letters on your Web page. Also, remember that you don’t have to worry about putting too many spaces (including blank lines) between content text and HTML tags. When a browser displays the document, it ignores the extra spaces. 12. Type </html> to complete the standard HTML tag setup. You’re now ready to name and save the file to your C:\music folder. 13. On the File menu, click Save. 14. In the Save As dialog box, type index.html in the File Name box and ensure that Text Documents is selected in the Save As Type drop-down list. (If necessary, click the arrow to select the Text Documents option.) 15. Use the Save In drop-down list and navigate to the C:\music folder on your computer. 16. Click Save and close Notepad. The file should now display as index.html in your C:\music folder, and the icon should indicate that the file is an HTML document. At this point, you can already view your file in your browser. To view your newly created HTML file, double-click index.html. The file should open in your Web browser. Notice that the only content is the Web page’s title text, which displays in your browser’s title bar. Now that the Web page’s title and standard HTML tags are in place, let’s add the page’s background image and default link colors. |
|
 |
|
|