|
| EWD Projects :: Oldschool |
|
|
|
Demystifying Basic HTMLCreating a TablePrint This Procedure ( doc :: pdf ) In this section, we show you how to create a table that will contain all the elements of your Web page. Controlling elements on a Web page is a little tricky because of the variable nature of browsers and browser windows, so many sites are designed using tables with hidden borders to help lay out Web pages. Eventually, style sheets will take over the job of formatting and aligning Web pages, but for now thousands and thousands of Web pages rely on tables to control the display of Web page elements. Of course, not every Web page uses a table, but you’ll find tables to be an extremely useful tool. Basically, tables use three tags: · <table></table> delineates the start and end of a table. · <tr></tr> indicates a table row. <tr> tags are nested within a <table> tag set. · <td></td> defines the start and end of a cell within a table. <td> tags are nested within a <tr> tag set. In the music site, you’ll create a two-column, three-row table: 1. If necessary, open Notepad, WordPad, or TextEdit, and then open C:\music\index.html from within the text editor. If you don’t see the index.html file, remember to ensure that the Files Of Type list box displays All Files (*.*). 2. In the index.html file, click below the opening <body> tag (the <body> tag should now contain the attributes you added in the previous section), type <table border="1" width="100%" cellpadding="5" cellspacing="0"> and press Enter. Notice the quotation marks around the attributes’ values. Make sure you include beginning and ending quotation marks throughout. Here’s the purpose of each of the attributes included in the opening <table> tag: · border defines the width of the table’s outline in pixels. For now, we’re showing a 1-pixel border to aid in seeing the table while you design. After the page design is complete, you’ll change border="1" to border="0" to hide the table borders on your Web page. · width defines the table’s exact pixel width or specifies the percentage of the browser’s window that the table should fill. We’re using a table to format the entire page, so the table is sized to fill 100 percent of the browser’s window space. · cellpadding creates a space (measured in pixels) between the cell contents and the table border. After sampling a few spacing parameters, we found that adding a cellpadding value of "5" did the trick. This type of setting exemplifies the value of testing settings, saving, and previewing your HTML page during the creation process. · cellspacing specifies the amount of space (in pixels) between cells. In the music site, we didn’t need to specify any spacing between cells, so we set the attribute to "0". 3. Type <tr> to start the first table row. 4. Press Enter, press Tab to make reading your code easier, and type <td valign="top"> to begin the first cell in the first row. The valign="top" attribute indicates that you want to align the cell contents to the top of the cell (by default, cell contents align to the middle). You can align cell contents using the values top, middle, bottom, or baseline. Also, by default, cell contents align at the left. (Later we show you how to change the default alignment by centering contents within a cell.) 5. Press Enter twice, press Tab, and type </td> to mark the end of the first cell in the first row. 6. Press Enter twice, press Tab, and type <td valign="top"> to create the second cell in the first row. 7. Press Enter twice, press Tab, and type </td> to mark the end of the second cell in the first row. 8. Press Enter and type </tr> to complete the first row of your table. 9. Press Enter and repeat steps 3 through 8 to create the second table row (or copy and paste all the code starting with <tr> and ending with </tr> to create a second table row, as described in the tip). 10. Press Enter after creating the second table row, and then create a third row by retyping the commands in steps 3 through 8 or by copying and pasting the table row code. 11. After entering the third table row, press Enter and type </table> to complete the table tags. tip If you prefer not to retype the table row commands when creating the second and third table rows, click before the first row’s <tr> command and drag to select all the text up to and including the </tr> closing command. Then press Ctrl+C to copy the selected code. Click after the </tr> command, press Enter, and press Ctrl+V to paste the copied HTML code into your text document. Press Ctrl+V again to create the third table row. Copying and pasting saves time as well as helps to ensure accurate coding as long as the original copied code is error-free. Finally, you’ll add a width attribute to the two cell tags (<td>) in the first row of the table. You can assign column width by percentage (for example, the left column could be assigned to take up 50 percent of the browser window), or you can insert an exact pixel measurement. By default, if you don’t include the width attribute in table cells, the table sizes the columns based on the size of the cell content and the size of the browser window. You need to add the width attribute to only one cell in a column (and if you have conflicting measurements in cells in the same column, the browser will use the largest setting by default). To keep our setup orderly, we’ll add the width attribute to the cells in the first row: tip Using fixed measurements are useful for navigation bars. Using percentages is useful for large areas that can resize to accommodate a browser window
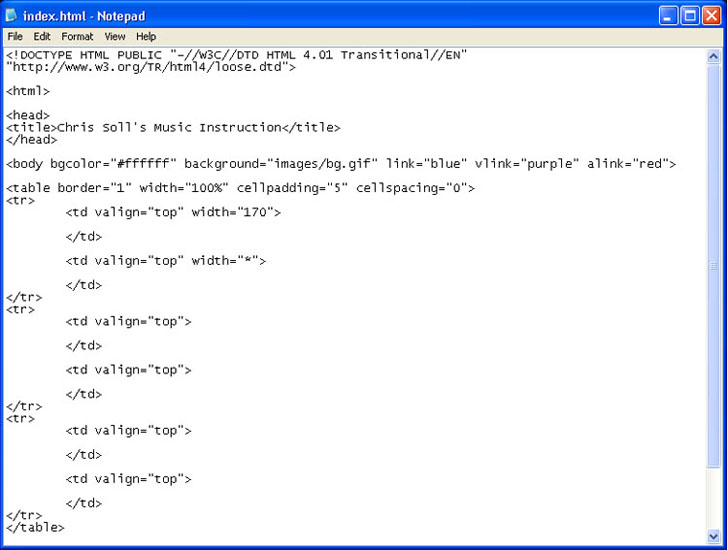
note If you don’t define column widths in tables by adding the width attribute to <td> tags, browsers automatically size the columns based on each column’s widest item and the browser’s window size. 12. In the first cell in the first row, click after "top", press the spacebar, and type width="170" to set the first column to 170 pixels wide. 13. In the second cell in the first row, click after "top", press the spacebar, and type WIDTH="*". The asterisk in place of a pixel number indicates that the browser should allow the second column to be as wide as necessary to fill the remaining table width. Because this table is formatted as 100 percent of the browser window, the asterisk instructs browsers to expand the second column to fill the remainder of the browser window area. note An asterisk in the width attribute equates to “the rest of the browser window” and enables developers to configure a cell to resize as the browser window is resized without specifying a percentage number. 14. Save your HTML document. Your HTML code should look like the code shown in the figure.
Creating the structure for your Web document's contents (added table code shown in red) Now that your table is in place, you’re ready to enter content into the table. The first order of business is to insert the logo into the top-left corner. |
|
 |
|
|